แสดงกระทู้

This section allows you to view all posts made by this member. Note that you can only see posts made in areas you currently have access to.


Topics - golfreeze

Pages: 1 ... 5 6 [7] 8 9 ... 73
92
==install php-mcrypt module on php7.2 centos7 directadmin
cd /usr/local/src
rm -rf mcrypt-*
/usr/local/php72/bin/pecl channel-update pecl.php.net
/usr/local/php72/bin/pecl download mcrypt || /usr/local/php72/bin/pecl download channel://pecl.php.net/mcrypt-1.0.1
tar -zxvf mcrypt-*.tgz && cd mcrypt-*/
/usr/local/php72/bin/phpize
./configure --with-php-config=/usr/local/php72/bin/php-config
make && make install
echo "extension=mcrypt.so" >> /usr/local/php72/lib/php.conf.d/90-custom.ini

==test
/usr/local/php72/bin/php -i | grep ^mcrypt

mcrypt
mcrypt support => enabled
mcrypt_filter support => enabled
mcrypt.algorithms_dir => no value => no value
mcrypt.modes_dir => no value => no value

special thank : https://help.poralix.com/articles/install-mcrypt-for-php-72-on-directadmin-server

93
Unable to connect to any site for a license update on directadmin

=== client-id=123 , license-id=1234
cd /usr/local/directadmin/scripts
./getLicense.sh 123 1234
service directadmin restart

https://help.directadmin.com/item.php?id=30

94
I wish to automate new DMARC records for all new domains

If you like the above setup, and you want to automate it's addition to all new dns zones, you can run the following:
cd /usr/local/directadmin/data/templates/
mkdir custom
cd custom
cp ../dns_txt.conf .

and then add the record you want to the bottom of the custom/dns_txt.conf by running this command:
echo '_dmarc="v=DMARC1; p=none; sp=none; rua=mailto:spam-reports@|DOMAIN|"' >> dns_txt.conf

keeping in mind that this assumes you've got a spam-reports account created already.

==reference site
https://help.directadmin.com/item.php?id=596

95
https://help.directadmin.com/item.php?id=569
Assumes you've got /etc/exim.conf 4.5.x or newer.
Turn it on
#cd /usr/local/directadmin
#./directadmin set dkim 1

Enable it in the exim configs and exim:
cd /usr/local/directadmin/custombuild
#./build update
#./build exim
#./build eximconf

Turn it on required domains
#cd /usr/local/directadmin/scripts
#./dkim_create.sh domain.com

96
รวม bootable iso ผ่าน flash drive support mac , window , linux os
https://unetbootin.github.io/

97
I need IMAP compiled into php   Last Modified: Mar 28, 2019, 11:58 am
If you need imap compiled into php, run these pre-install commands:
CentOS
yum -y install pam-devel

Debian
apt-get install libc-client-dev


Once pre-install is done for your OS, run the following:
cd /root
wget -O imap_php.sh files.directadmin.com/services/all/imap_php.sh
chmod 755 imap_php.sh
./imap_php.sh

supports both CustomBuild 1.x and 2.x.
For CB2, it will automatically detect the configure.phpX path.

Note that this is beyond our technical support.
Check IMAP in PHP status
Note that version 1.2 of this script now supports the ability to call it like this:
./imap_php.sh --check

===reference
https://help.directadmin.com/item.php?id=341

98

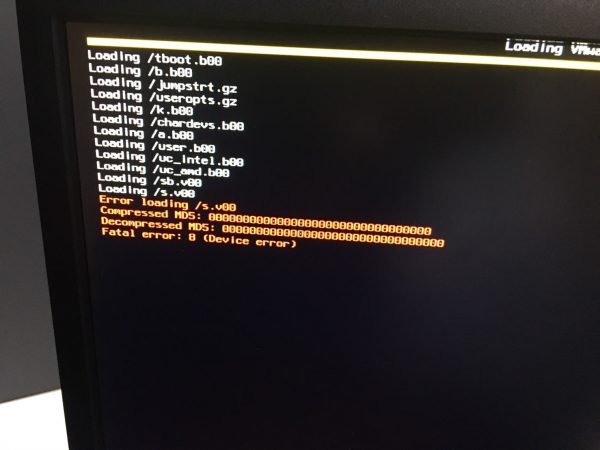
อัฟแรมเครื่องเซิฟเวอร์แล้วเจอปัญหา บน ESX-i 6.x
error loading s.v00 fatal error:8 (Device error) on esx-i 6.x

เท่าที่ลองเชคดูเป็นปัญหาของ md5sum ที่เชคไฟล์ s.v00 เป็น module หนึ่งที่ต้องทำการเชคในช่วงบูต ESX-i ครับ
วิธีการแก้ไขปัญหานั้น ไม่ยากเท่าไรครับ แต่ว่าต้องใช้งาน flash drive สองตัว

=== อุปกรณ์ที่ต้องเตรียม และ
1. ทำการ boot slax linux ที่เป็นตัว liveCD เพื่อเข้าไปใช้งาน environment เสมือน livecd ผมใช้งานเป็น slax-32bit ครับ
http://ftp.sh.cvut.cz/slax/Slax-9.x/slax-32bit-9.11.0.iso
โหลดมาแล้ว build bootable ผ่านตัว unetbootin for mac ครับ 
2. flash drive อีกไฟล์คือหาไฟล์ s.v00 มาจากตัว iso image ของตัว esx-i ครับแล้ว copy มาเตรียมรอไว้
3. Harddisk ของตัวที่มีไฟล์ s.v00 ที่มีการ corrupted นี้

เริ่มแรกทำการบูตข้ึนมาด้วย slax ก่อนครับเลือกบูตจาก USB drive ใน bios
หลังจากเข้ามาใน slax livecd ทำการเปิด terminal ขึ้นมาเพื่อเชค device name ของตัว hdd และ flashdrive ที่เตรียมไว้
dmesg | less

===hdd ที่เป็น esx-i ผมถูกระบบให้ใช้งานเป็น sda ครับ
128GB=> /dev/sda (esx-i) boot
/dev/sda5 => 250MB

slax=/dev/sde1 bootable flashdrive
sandisk=/dev/sdf2 มีไฟล์ s.v00 ตัวใหม่

=== ทำการ mount ทุกตัวขึ้นมา
mount /dev/sdf2 /mnt/sdf2
mount /dev/sda5 /mnt/sda5
ทำการ copy s.v00 ตัวเก่าไว้ก่อนนะครับ
cp /mnt/sda5/s.v00 /mnt/sdf2/s.v00_corrupt

หลังจากนั้นเอาไฟล์ s.v00 ที่แตกมาจาก iso ของ esx-i 6.x ที่โหลดจาก vmware แล้ว copy ไปใสที่ /dev/sda5
md5sum /mnt/sdf2/s.v00
cp /mnt/sdf2/s.v00  /mnt/sda5/.

เสร็จแล้วทำการ check sum ไฟล์ที่ copy ไปที่ sda5 อีกทีเพื่อดูว่าเป็นค่าเดียวกันหรือเปล่า
umount /mnt/sda5
ทำการ reboot แล้วให้ไป boot ที่ hdd ของ esx-i บนเซิฟเวอร์แล้วลองเข้าใช้งานดูครับ

: )
suuport [at] packetlove [dot] com

99
การย้าย vm hdd ไปยัง datastore ใหม่
เคสนี้เอาไว้ใช้แก้ไขปัญหา ในกรณีพื้นที่ของ hdd ใน datastore ที่ใช้งานอยู่เกือบเต็ม (เลยทำให้ไม่สามารถเพิ่ม RAM ใน esx-i ได้ครับ)
เราสามารถทำการ shutdown vm นั้นก่อนแล้ว ทำการ move ใน datastore
โดยทำการเลือก hdd ต้นทาง แล้วก็ตัว hdd ปลายทางที่ต้องการย้าย data vm นั้นๆไปครับ ดูเพิ่มเติมในลิ้งด้านล่างได้เลย
ไม่ต้องมี license v-center ก็ใช้งานใน function นี้ได้ครับผม : )

https://networklessons.com/uncategorized/vmware-esxi-5-move-vm-to-different-datastore

ทีมงาน @ support [at] packetlove [dot] com

100
#whois packetlove.com
using server whois.verisign-grs.com
connection refused

ถ้าเกิดเจอเหตุการณ์แบบนี้ สามารถเชค iptables rule หรือ csf (configure server firewall) ได้นะครับ
#vi /etc/csf/csf.conf

เพิ่มในส่วนของ TCP_OUT = "43"
# Allow outgoing TCP ports
TCP_OUT = "43"
แล้วทำการ reload csf rule
#csf -r

แล้วลองรัน whois command อีกทีก็จะสามารถออกไปได้ละครับผม : )

101
==== Update license in FreeBSD ==== fixed
==== * An error has occurred while trying to update the license file *

cd /usr/local/directadmin/scripts
./getLicense.sh CID LID 103.x.y.z
/usr/local/etc/rc.d/directadmin restart

102
ในกรณีเราใช้งาน docker image ที่เป็น syslog-ng หรือ syslog ที่ port 514 (tcp/udp)
เราสามารถที่จะ troubleshooting ปัญหาว่ามี log ส่งผ่าน container ตัวนี้หรือเปล่า
โดยใช้งานตัว netshoot ซึ่งรวบรวม command เกี่ยวกับ tcpdump,route และ command อื่นๆ ให้ troubleshooting ได้ครับดูเพิ่มเติม
https://github.com/nicolaka/netshoot

===run command
docker run -it --rm --net container:<container_name> nicolaka/netshoot tcpdump

===or check more info before access pull tcpdump on that container then output to pcap file
ssh to server
docker ps -a
===send command tcpdump to capture syslog on src
docker run -it --rm --net container:syslog_service_1 nicolaka/netshoot tcpdump src port 514 -w abc.pcap

103
$ git pull origin master

From https://github.com/mkyong/java-concurrency
 * branch            master     -> FETCH_HEAD
 
fatal: refusing to merge unrelated histories

ทำการแก้ไขโดย

$ git pull origin master --allow-unrelated-histories

From https://github.com/mkyong/java-concurrency
 * branch            master     -> FETCH_HEAD
Merge made by the 'recursive' strategy.
 LICENSE | 674 ++++++++++++++++++++++++++++++++++++++++++++++++++++++++++++++++
 1 file changed, 674 insertions(+)
 create mode 100644 LICENSE

แล้วทำการ push ใหม่อีกรอบโดยเริ่มจาก

$git add .
$git commit -m "Add Staging 1"
$got push -u origin master

104
แก้ไขปัญหา Cross-Origin Resource Sharing (CORS) ใน dev-tool ของ browser ขึ้นเตือน

เกิดจากในหน้าเว็บมีการเรียกใช้งาน url ระหว่าง frontend , backend แยกกันซึ่งทำให้ resource
บางส่วนไม่ได้ถูกแชร์หรืออนุญาตให้ url มาดึงได้ ดังนั้นเลยต้องประกาศว่า ให้ url ไหนบ้างที่สามารถมาดึง resource ได้ 

===== Basic
Access-Control-Allow-Origin: คือ Origin ที่อนุญาตให้ใช้ Resource ร่วมกันได้
Access-Control-Allow-Methods: คือ Methods ที่อนุญาตให้ใช้ในการติดต่อได้
Access-Control-Allow-Headers: คือ Headers ที่อนุญาตให้ใช้ในการติดต่อได้

==== Add in js
const express = require("express")
const app = express()
const PORT = process.env.PORT || 8445

app.use((req, res, next) => {
   let ALLOW_ORIGIN = ['domain-a.com', 'domain-b.com', 'domain-c.com']
   let ORIGIN = req.headers.origin
      if (ALLOW_ORIGIN.includes(ORIGIN)) {
        res.header('Access-Control-Allow-Origin', ORIGIN)
      }
      res.header('Access-Control-Allow-Methods','POST, GET, PUT, PATCH, DELETE, OPTIONS')
      res.header('Access-Control-Allow-Headers','Content-Type, Option, Authorization')
      return next()
   })
}

app.use('/', (req,res) => res.send("test"))
app.listen(PORT, () => { console.info(`server started on port ${PORT}`)})

105
command , shell script ,tool , crontab / ssh command send to remote host howto by packetlove team
« on: พฤศจิกายน 22, 2019, 06:31:06 am »
เราสามารถประยุกต์ใช้ ssh command send to remote host ได้นะครับ
ในกรณี เราทำเรื่อง authentication via public key เรียบร้อยแล้ว เราสามารถสั่งให้ เครื่องต้นทาง run ssh command ที่ฝั่ง remote host ได้ดังนี้

ssh -t -p22 testssh2@203.86.x.5 'ls /home'

ก็จะเป็นการ ls /home ที่เครื่อง 203.86.x.5
แล้วเราก็สามารถสั่งให้ไปรัน shell script ในเครื่อง 203.86.x.5 ได้ดังนี้

ssh -t -p22 testssh2@203.86.x.5 '/home/testssh2/testscript.sh'

เท่านี้เองครับผม : )
Support [at] Packetlove [dot] com

Pages: 1 ... 5 6 [7] 8 9 ... 73